This article explains how to build an email template to be used in our email editor. You can still use any html for sending an email.
We provide example template you can download and modify.
Also consider having a modified template in your Template Gallery.
If you decide to use your own html, you can paste it in the code section. If the copied html does not follow our guidelines, editor is disabled.
Preview and Unsubscribe tags:
<a href="" class="vtpreview">preview in browser</a>
<a href="" class="vtprofile">profile preferences</a>
<a href="" class="vtunsubscribe"> click here to unsubscribe </a>
<a href="" class="vtsubconfirm">confirm subscription</a>
Those A tags with specific class names will get href attribute replaced with links to the respective pages:
- vtpreview > preview in browser
- vtprofile > profile preferences page
- vtunsubscribe > unsubscribe from emails
- vtsubsconfirm > subscription confirmation
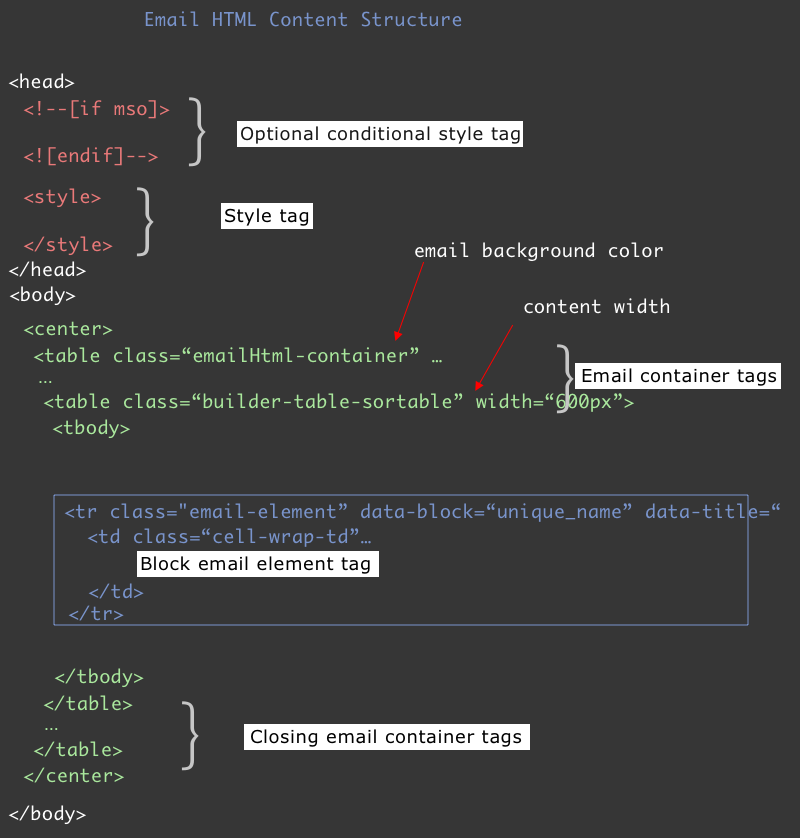
Email container tags (HTML Content header & footer)
- body tag needs to contain one <table> with class=”emailHtml-container”
- this table should have only one <tr> and one <td>
- style from this table and it’s <td> will be copied inside the editor
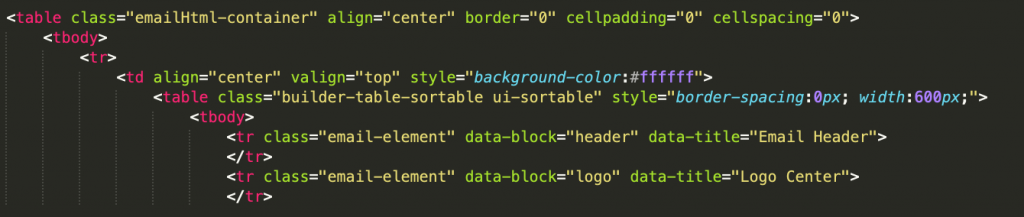
Example of html header
<body leftmargin="0" marginwidth="0" topmargin="0" marginheight="0" offset="0" yahoo="fix">
   <center>
       <table class="emailHtml-container" align="center" border="0" cellpadding="0" cellspacing="0" height="100%" width="100%" id="bodyTable" style="font-family: 'Aleo', Raleway, Helvetica, Open Sans, georgia, serif; border-spacing:0px ;border-collapse:collapse">
           <tr>
               <td align="center" valign="top" style="background-color:#fff;padding:0px 0px 40px 0px">
Content blocks
Inside table with class=”builder-table-sortable” there will be <tr> elements with class=”email-element”.
This table is important to support the drag&drop feature of our editor.
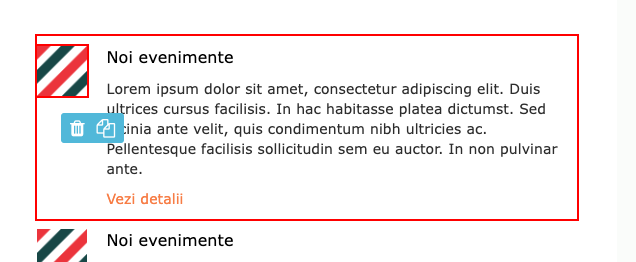
For block elements that are repetitive, you can add block-item as attribute. This will make it interactive and upon click you’ll get 2 small buttons: delete and duplicate.
- delete will remove the element
- duplicate will just append an identical copy just after the same element.
Footer
The following are the closing tags for the above header.
</td></tr><tbody></table>
<!-- end of table sortable -->
               </td>
            </tr>
        </table>
     </center>
  </body>
</html>
Content elements (email element tags)
Element blocks
- there are <tr> elements inside with class=”email-element”
- each of these <tr> needs to have data-block=”” and data-title=”” attributes. Data-block value should be unique across template. Data-title is used to describe content of block. Those are visible in the drag&drop section inside the editor.
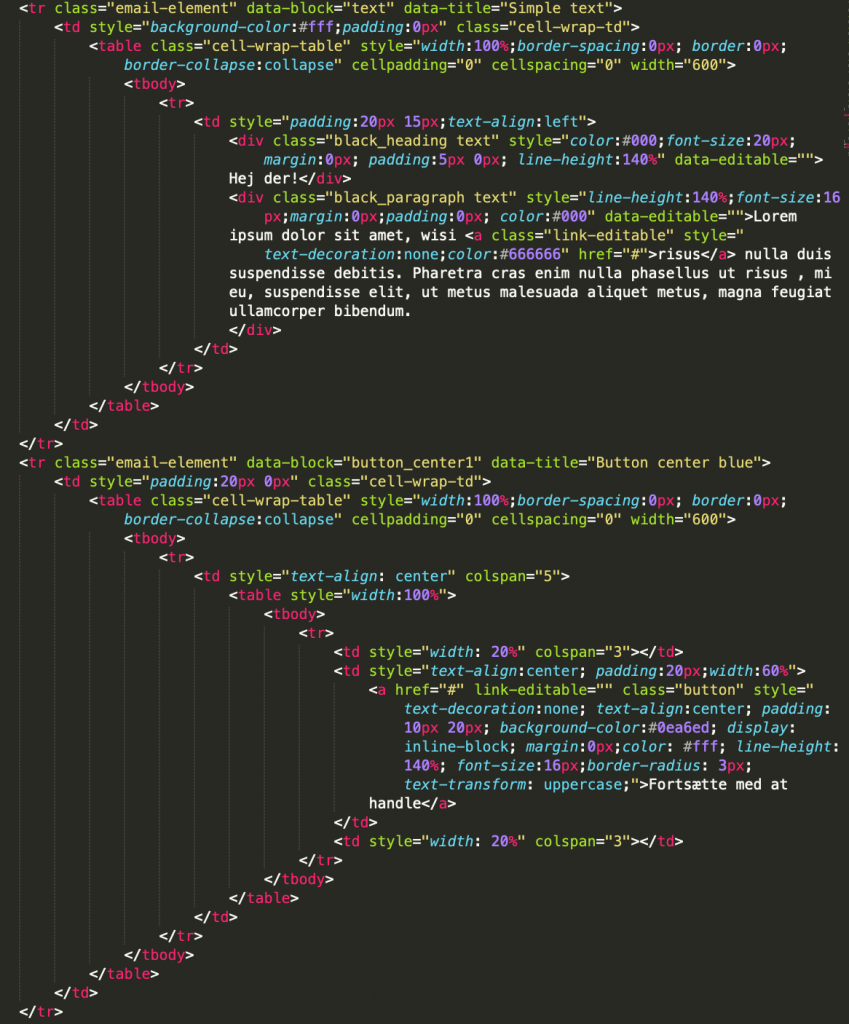
- each <tr> should only have one <td> with the class=”cell-wrap-td“
- this <td class=”cell-wrap-td”> tag can have background-color. This color can be changed using our editor. If any content of this <td> has background-color, it needs to be changed manually
- <td class=”cell-wrap-td”> content can be anything. Usually we follow a table structure format inside it to specify top, bottom, left and right paddings using td.
Example block element containing logo in the center
<tr class="email-element" data-block="logo2" data-title="Logo center" style="left: 0px; right: 0px;">
<td style="background-color:#fff;padding:0px" class="cell-wrap-td">
<!-- content for the element -->
<table class="any-content-table" style="width:100%;border-spacing:0px; border:0px;border-collapse:collapse" cellpadding="0" cellspacing="0" width="100%">
<tbody>
<tr>
<td style="text-align:center;width:100%;line-height:1px" valign="top">
<a href="http://example.com" style="line-height:1px"><img src="http://www.example.com/logo.png" style="max-width:100%; padding:0px 0px;margin:0px;" alt="" title="" img-editable=""></a>
</td>
</tr>
</tbody>
</table>
<!-- end of content -->
</td>
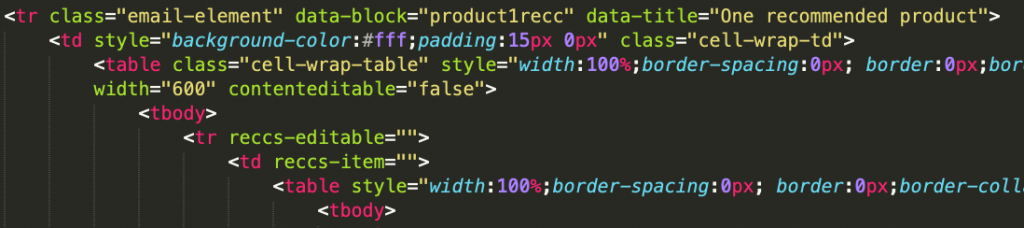
</tr>Example block element containing two products with recommendations
<tr class="email-element" data-block="products2reccs" data-title="Two recommended products" style="left: 0px; right: 0px;">
<td style="background-color:#fff;padding:0px" class="cell-wrap-td">
<!-- content for the element -->
<table cellpadding="0" cellspacing="0" width="100%">
<tbody>
<tr>
<td reccs-editable="" align="center">
<!-- this table.reccs-item gets multipled -->
<table reccs-item="" class="box-item">
<tbody>
<tr>
<td style="padding-right:2%">
<div class="box-image">
<a href="#" class="item-url"><img class="item-image" src="http://cdn.domain.com/assets/images/productimage.png" title=""></a>
</div>
<div style="text-align:center; padding:0px 0px 20px 0px" class="box-info">
<a href="#" class="item-url">
<div class="item-title">Product title</div>
<div class="isDiscount"><span><span class="item-price">020.00</span> USD</span> <span style="color:#ff3300"><span class="item-discountPrice" style="">00.00</span>USD</span>
</div>
<div class="notDiscount" style=""><span style="color:#444;" class="item-price">00.00</span>USD</div>
</a>
<div style="padding-top:10px"><a href="#" class="button_small item-url" style="">Add to cart</a> </div>
</div>
</td>
</tr>
</tbody>
</table>
<!-- table.reccs-item gets duplicated here -->
</td>
</tr>
</tbody>
</table>
<!-- end of content -->
</td>
</tr>Specific tags rules
Rules for block rows containing recommendations
- in .html the <tr class=”email-element”> containing reccs should also have data-logic=“{}” attribute. Empty logic is considered “{}” or “”
- there must be at least 1 tag (usually <td> or <tr> inside a table) with reccs-editable=”” attribute (the html block containing each product information). This elements will get multiplied by the number of products specified in the block configuration
- Don’t put reccs-editable=”” on the child tag right after <tr class=”email-element” <td> <table reccs-editable.. (the visual editor won’t work). A solution is to wrap it under another <div> tag.
- In the template, add the “reccs-item” item as many times as it looks good in the template. If default would be to have 2 products side by side, add 2 such tags. They will be managed by the editor for any number of items.
- all tags with reccs-item=”” attribute should be siblings, on same level (not inside other tags).

- first element with reccs-item will be put inside the loop for the specific position, with reccs-item attribute removed and all children tags that have item-attrName will have their content replaced with item attribute
- style, align and class for the rest of tags with “reccs-item” are saved and added accordingly to each element in the loop based on index (1st, 2nd, 3rd)
- if there are 3 elements
- 4th, 7th, 10th … element will get values from 1st
- 5th, 8th, 11th … element will get values from 2nd
- 6th, 9th, 12th … element will get values from 3rd
- if there are 2 elements
- 3rd, 5th, 7th … element will get values from 1st
- 4rd, 6th, 7th … element will get values from 2nd
- the first reccs-item tag is multiplied in the loop. (the rest are removed), so we recommend using identical elements
- you can use vt-loop-display-___ class names to show/hide subtags depending on the needs.
- tags with classes “isDiscount” and “notDiscount” to display correct prices should be siblings (same level within parent) and close to each other

- tag with class discountPercent will be removed when item does not have a discount . Add – % signs before or after like below. Use item-discount class to have it’s content replaced by the rounded discount

Multiple products on the same line:
- inside reccs-editable tag should be at least one tag with reccs-item attribute that will be substituted inside returning html (reccs-editable tag content will be replaced with reccs-item (vtproduct with data-id=”posX”)
- consider adding reccs-item on an item that can be multipled at the same level.
<td reccs-editable>
<table>
<tr>
<td reccs-item> <!-- works find but if you want 10 products all will be on the same line -->
...
<table reccs-item> <!-- better approach to make the template responsive. -->
Note: in our gallery editor the algorithms popup is not available.
Rules for rows containing manually editable items
Note: We recommend having only recommendations blocks with reccs-editable. The editor does the conversion automatically to allow you to manually select items in the editor.
Classes that need to be added inside the [item-editable] container:
<tr>
 <td>
<table item-editable="">
...
</table>
 </td>
</tr>
Item attributes classes:
Elements having the following classes are being replaced with specific product attribute values. The rule here is class name to start with “item-” followed by attribute name. Note that this is case sensitive.
- item-url – href attribute of <a> tag is replaced with product url
- item-image – src attribute of <img> is replaced with product image
- item-title – replaced with product title
- item-desc – replaced with product description
- item-price – item price
- item-discountPrice – item discount Price
- item-attrName any tag with class name with this format “item-attrName” will get it’s content replaced with **|product.attrName|** See below.
- 2 exceptions for A and IMG tags where we replace value for href, respectively src attributes when the value of the item attribute starts with http
- <a class=”item-attrUrl” href=””></a> will get href value replaced with item attrURL if this starts with http
Price and discountPrice tags will not include currency. Currency should be displayed in a tag before or after it.
- tags with currency_before class name get their content being replaced with value set on your account
- tags with currency_after class name get their content being replaced with value set on your account
Some other custom classes that can be added to html tags.
- notDiscount – gets removed when product is not on sale (does not have discountPrice)
- isDiscount – gets removed when product is on sale (has discount price)
All other elements having the class name like item-attributeName will have their content being replaced with the value of the item attribute.
<span class="item-attributeName"></span>
will become
<span class="item-attributeName">**|product.attributeName|**</span>
Here is a full list of values replacements being made when email content is saved.
Rules for Text tags
- To make texts editable please add data-editable attribute to any <div> <p> <span> tags
- you can also have data-editable added to tags containing item-attrName classes. In this case we will ignore and not replace the content when you update the value
Rules for IMG tags
- add img-editable attribute on <img> tags
- take parent width (usually TD) by having max-width 100%
- height is not set, neither max-height when client has the option to upload images
Rules for A tags
- add link-editable attribute for normal links
- if button add class=”button_small” (only on the <a> tags)
- if <a> contains an img then should only have img-editable on the <img> tag and not link-editable on the <a>
Solution for product images with different heights
- On the <img tag with class=“item-image” add height=”170”
ex: <img class=“item-image” src=“http://cdn.domain.com/assets/images/productimage.png” title=“” style=“max-width:100%” alt=“” width=“180” height=”170”>
OUTLOOK
Images must have the width attribute ex: width=“180”
HTML Classes to use for using visual editor
Classes used for design
Our visual editor allows editing of template without knowledge of HTML and CSS. In the Style sidebar you have some configuration options for email.
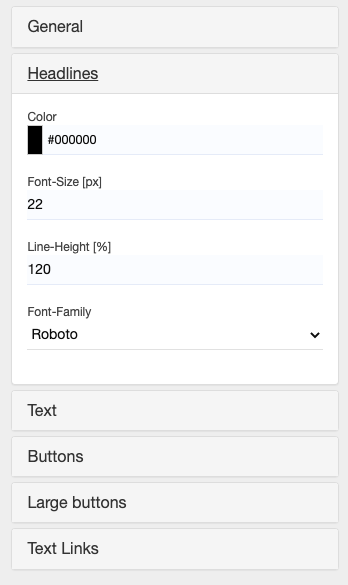
Those configurations apply to the email editor if special CSS selectors (class names) are used.
| Headline texts | class: text_heading |
| Paragraphs | class: text_normal |
| Buttons | class: button_small |
| Button Container | class: button_small_container |
| Big buttons | class: button_large |
| Big Button Container | class: button_large_container |
| Links within Paragraphs | automatically. |
HTML code for buttons. This code is made to work in almost any email client, as well as matching our editor. We use containers for buttons in order to display buttons correct in apps like outlook.
<table cellpadding="0" cellspacing="0" role="presentation" style="mso-table-lspace:0pt;mso-table-rspace:0pt;border-collapse:collapse;border-spacing:0px" width="100%" class="">
<tr>
    <td align="center" style="padding:0;Margin:0;">
        <span class="button_large_container" style="border-style:solid;border-color:#000000;background:#000000;border-width:2px;display:inline-block;border-radius:10px;width:auto">
            <a class="button_large" href="#" style="mso-style-priority:100 !important;text-decoration:none;-webkit-text-size-adjust:none;-ms-text-size-adjust:none;mso-line-height-rule:exactly;color:#FFFFFF;font-size:16px;border-style:solid;border-color:#000000;display:inline-block;background:#000000;border-radius:10px;font-family:arial, 'helvetica neue', helvetica, sans-serif;line-height: 140%;font-size: 18px;color: #ffffff;text-align:center; padding:8px" target="_blank" link-editable>
                CONTINUE SHOPPING
            </a>
        </span>
    </td>
</tr>
</table>
Other classes that can be used
On any type of content our system products you can use a set of default classes that will replace elements automatically.
Filters for tags and dynamic values:
We use Jinja as our template engine: Entire documentation can be found here: http://jinja.pocoo.org/docs/dev/templates/
Please see Dynamic Tags and modifiers article
CSS Variables Support
Starting in Aug 2024 we added support for CSS variables inside email templates. The rules:
- you need to use the @media (max-width: 768px) for mobile and @media (min-width: 768px) for larger screens
- values from mobile CSS media query will be the default used in inline CSS
- you must overwrite those with class names and !important for larger screens
@media (max-width: 768px) {
        :root {
            --content-width: 90%; /* Adjusted to be more fluid */
            --block-width: 100%;  /* Adjusted to fit the screen */
            --cell-padding: 20px; /* Smaller padding for mobile */
        }
    }
    @media (min-width: 768px) {
        :root {
            --content-width: 630px;
            --block-width: 700px;
            --cell-padding: 35px;
            --color-primary: #F8884F;
            --bck-color: #F1F5F9;
        }
        .vt-block {
            width: 700px!important;
        }
        .vt-content {
            width:630px!important;
        }
    }
The benefit of CSS variables is that you can easily replace the values in a single place in the custom email template and they are being replaced automatically.
If you don’t use the 768px media query, the replacement won’t be done.
For example:
<table cellpadding="0" class="vt-content" cellspacing="0" style="border-spacing:0px;width:var(--content-width)">This will become like below in the sent email (we replace the var(–content-width) with the value for mobile media query.
<table cellpadding="0" class="vt-content" cellspacing="0" style="border-spacing:0px;width:90%">