The following article presents how to add our Marketing Automation solution for Magento stores.
Note that extension is tested with Magento 1.9 and 2.4, but should work with older versions of Magento as well. If there are any situations you see errors or events not being sent correctly, please contact us. Download the right version of the extension from your account.
Install extension to your Magento store
After downloading you will have a ZIP archive. At this moment you have only 1 way of installing it: through FTP access
1. Install VTMarketing extension for Magento 1.9 through FTP
- You need to unarchive the ZIP file. The archive has a root folder called magento19-vtmarketing, that looks like this

- Login to your FTP account, go to folder root installation
- Upload the folder app from your computer into root folder (another directory called app should be there, just merge them). Make sure you copy the folder, and not it’s contents. No files will be overwritten, we will only add the ones required by our extension.
- If you’re being asked by your ftp application to either merge or replace, always choose merge!
- That’s all. Now go to the next section of this article, the configuration.
2. Install VTMarketing extension for Magento 2.4 through FTP
- Unarchive the ZIP file. The archive has a root folder called VTMarketing.
- Upload this folder in the /app/code directory of your Magento installation. You will end-up having it like this:

- That is all. Clear cache and it should appear under your admin settings.
Configuration For Magento 1.9
Change settings of our Magento marketing plugin
VTMarketing Automation extesion will be added to your magento extensions list. Go to System -> Configuration.
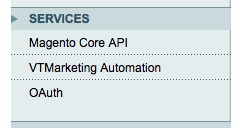
Click on VTMarketing Automation from the left-side list to open the settings screen, same as below:
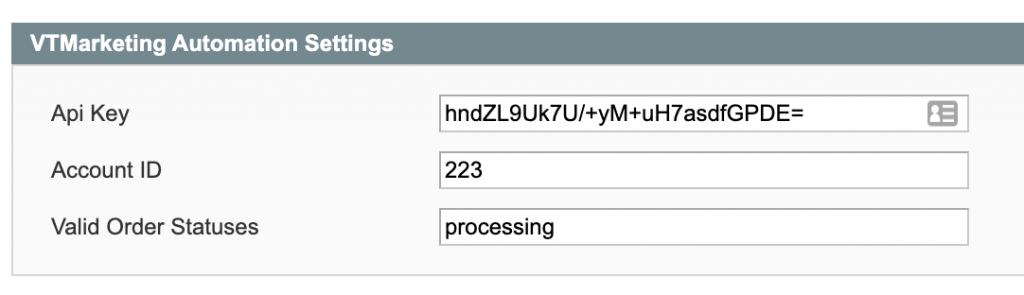
- API Key is used for our server to communicate with your shop in a more secure way. You must copy it from your account (Settings -> Account Profile -> Api Key)
- Unique ID is used to send events from server_side. (Settings -> Account Profile -> Api Key)
- Valid order statuses -> When orders are updated with this status they get sent to our system. You can enter multiple separated by comma.
Click Save Config to save your key and sync settings with our systems.
Magento MultiStore configuration
If you have multi store running on your Magento installation, and each store is available under a different domain, please follow the instructions below.
Choose each store from the left side. Under settings there will also be “Account ID” which needs to be updated for each store (considering that you already created account for each of the stores)
Edit Order Statuses
Orders are sent server-side, in order to limit the risk of adblockers or javascript errors on thank you page. You can set the order status in module settings to only pass orders of specific statuses.
Note that our system is smart enough to only accept an order once, based on the order id. To read more about Magento order statuses, click here.
Make sure you get statuses not states. Usually the status code column is on the left.
Product Feed Sync
We’ve discovered situations where the product feed url does not sync to our systems.
http://www.example.com/index.php/store_code/vtmarketingautomation/feed/export
If feed settings and url is empty, as below, please enter the above url (replace shop domain) or contact us to help you.
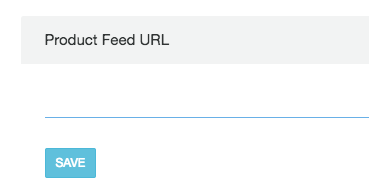
If you have multi store enabled also change store_code, otherwise remove it and only change example.com
Sometimes the product feed URL is not the right one, depending on various system configuration. You can try to load this URL in your browser.
If a “forbidden” message the URL is displayed, otherwise you need to enter the correct one.
Recreate Abandoned Cart
Starting with version 0.1.0, our Magento module is able to recreate abandoned carts on any device. There’s a huge advantage, because many people add to cart on one device (laptop) and can finish purchase on their way home.
Recreating carts is only available for transactional campaigns, that receive cartId along with the event. This is the URL that needs to be added to the call to action that links to the cart page.
http://www.example.com/index.php/store_code/vtmarketingautomation/index/cart?cartId=**|event.cartId|**
Configuration For Magento 2.x
Extension configuration is available under Store -> Settings -> Configuration -> Services
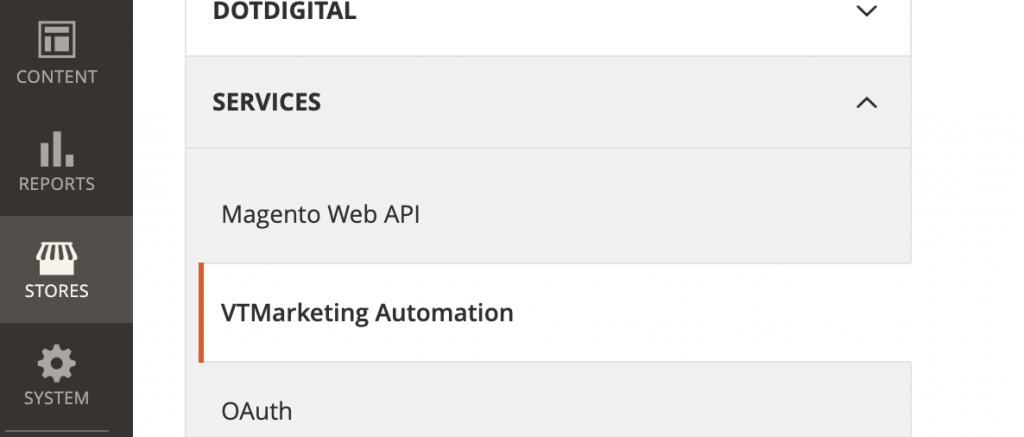
Same options are available like extension for Magento 1.9, please check above options.
What you should know
Some default events are sent server side through the module. That limits functionality of our solution on the website, on things related to the events: confirmation, addtocart and addtowishlist
Also, Magento new subscribers will be synchronised to our platform using the module (on both subscribe and unsubscribe).
Done. Marketing Automation for Magento is ready to boost sales!
That’s all. You’re now ready to start increasing sales for your Magento store using our marketing automation integration.