Our dashboard can be embedded into external software solutions with the following steps:
- you have a domain that is loaded over https
- you have access to make server side requests for authentication
- you have access to add custom javascript to authenticate our application
- you have an account with us (shop_id), as well as user credentials (email + password)
Step 1.
Provide the domain name to our support or account manager. The dashboard will only be made accessible to this domain name.
The limitation is done using a header “X-Frame-Options”: ALLOW-FROM https://yourdomain.com
Step 2.
Ask for the authentication key. This is custom and can only be used for authentication purpose.
$auth_apikey = "custom_api_key_token";
Step 3
Server side authentication request. This step is mandatory to authenticate the same user that has access to the specified account. All values are mandatory.
$data = array(
	'email' => '[email protected]',
	'password' => 'yoursecurepassword',
	'shop_id' => 105
);
The API url to make request with this data is provided by your account manager.
API Request:
- Successful API request will return a status code 200. Any other status is considered failed and would not lead to an authentication
- For example 403 Forbidden means that the user did not authenticate correctly for the specified account
Make a POST request to the provided authentication URL, using $auth_apikey as Authentication header and body payload with the credentials: email, password, shop_id. Failing to provide one of those will result in error.
API Response
Successful response will return a JSON encoded string in the body, similar format as our standard API.
Example response
{"results": [{
    "access":{"token": "", "accessId": "", "email": ""} ,
    "account":{"token": "", "shopId": ""}
}]}
You will need to get those values from results and pass them using Javascript, using postMessage.
JS PostMessage
Post message data is an object using the following keys and values:
- accessData: base64 encoded string of access key from the first result
- authorizationData: base64 encoded string of account key from the first result
{ "accessData" : base64_encode('{"accessId":"","email":"[email protected]","token":""}'),
'authorizationData' => base64_encode('{"shopId":213,"token":""}')}
Javascript Postmessage:
With the post message data being valid, you can pass the payload to our system. Best practice is to do it on the onload event and remove it afterwards, in order not to enter a loop on every load event.
Replace with the dashboard URL you are using.
<script>
const iframe = document.getElementById('mydashboard');
// Send the token when iframe is loaded
iframe.onload = function() {
    const iframeWindow = iframe.contentWindow;
	// Ensure the message is sent to the right origin (Angular app URL)
	iframeWindow.postMessage(postData, 'https://my.vtcdn.net');
	// important to reset the event, othrwise it will reload it
	iframe.onload = null;
};
</script>
PHP Code example
Here is a complete example using PHP. Make sure you replace the following values:
- instance api key
- data email, data password and shop_id
- url for the authentication API
- url for the dashboard panel
function test_curl($url, $method, $data, $headers) {
	$curl = curl_init();

	curl_setopt_array($curl, array(
	CURLOPT_URL => $url ,
	CURLOPT_RETURNTRANSFER => true,
	CURLOPT_HTTP_VERSION => CURL_HTTP_VERSION_1_1,
	CURLOPT_CUSTOMREQUEST => $method,
	CURLOPT_POSTFIELDS => json_encode($data),
	CURLOPT_HTTPHEADER => $headers,
	));

	$response = curl_exec($curl);
	$err = curl_error($curl);
	$httpStatusCode = curl_getinfo($curl, CURLINFO_HTTP_CODE);
	curl_close($curl);
	return array("body" => $response, "err" => $err, "status_code" => $httpStatusCode);
}


$instance_api_key = 'secret_Token';
// here we have password for the login
// shop_id is required to return authorization data for data account
$data = array(
	'email' => '[email protected]',
	'password' => '12345',
	'shop_id' => 50
);
// URL is built for the API instance and
$url = "https://api.vtcdn.net/v1/access/token";


// Authorization header is needed extra for Access API. This does not change
$headers=array('Authorization: ' . $instance_api_key);
$result = test_curl($url, 'POST', $data, $headers);


// successful login. Other statuses will be 403 for Forbidden
if ($result["status_code"] == 200) {
	$result["body"] = json_decode($result["body"]);
	// $result["body"]->results[0];
	$data = array(
		'accessData' => base64_encode(json_encode($result["body"]->results[0]->access)),
		'authorizationData' => base64_encode(json_encode($result["body"]->results[0]->account))
	);
	// printing the data to be available to the javascript below
	echo '<script>const postData=' .json_encode($data). ' </script>';
}


?>
<iframe width="100%" height="100%" id="mydashboard" src="https://my.vtcdn.net">
</iframe>


<script>

const iframe = document.getElementById('mydashboard');
// Send the token when iframe is loaded
iframe.onload = function() {
    const iframeWindow = iframe.contentWindow;
	// Ensure the message is sent to the right origin (Angular app URL)
	iframeWindow.postMessage(postData, 'https://my.vtcdn.net');
	// important to reset the event, othrwise it will reload it
	iframe.onload = null;
};

</script>
Dashboard Navigation
Navigate to specific routes
To navigate the dashboard from parent iframe you have access to a menu list. You will need to send a postMessage like below, changing the value for navigate accordingly.
const iframe = document.getElementById('mydashboard');
const iframeWindow = iframe.contentWindow;

const postData = {
   "navigate": "#/dashboard"
}
iframeWindow.postMessage(postData, 'https://my.vtcdn.net');
The possible menu items are those. Please note that values between <> need to be replaced. To return values of those please check our OpenAPI documentation.
#/dashboard

#/campaign/<campaign_type>
#/campaign/<campaign_type>/<campaign_id>
#/campaign/<campaign_type>/<campaign_id>/edit

#/users/segments
#/users/segment/<segment_id>

#/reports/users
#/reports/revenue
#/reports/events
#/reports/emailing
#/reports/exports

#/setup/feed
#/setup/gallery
#/setup/coupon
#/setup/webpush
#/setup/livestream
#/setup/orderimport
#/setup/pages
#/setup/integrations
#/setup/algorithms

#/account/profile
#/account/settings
#/account/history
#/account/emailing
#/account/access
#/account/personal
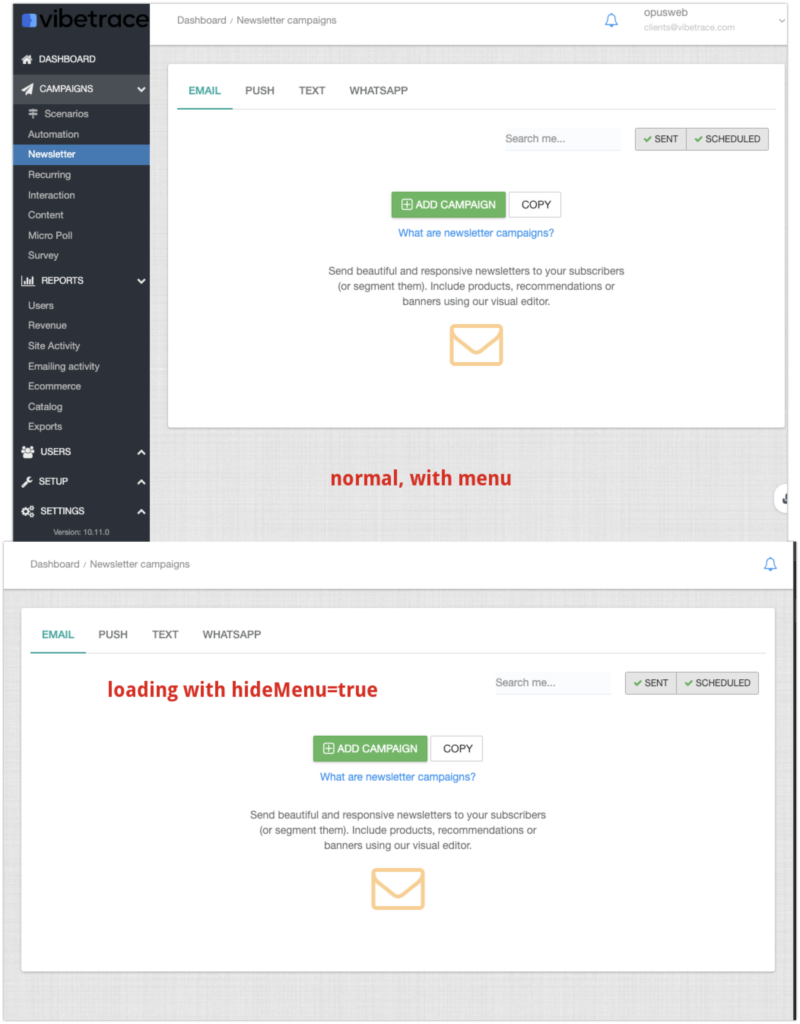
Hide top menu and sidebar
In order to hide left menu and the account menu you will need to pass a GET param to the iframe, like this: https://my.vtcdn.net?hideMenu=true